Introduction:
Embarking on the journey of baking your own gluten-free sourdough bread can be a delightful and rewarding endeavor. This comprehensive guide breaks down the process into simple, easy-to-follow steps, ensuring that even beginners can achieve bakery-quality results right from their home kitchens. From sourcing the right gluten-free flours to maintaining a healthy sourdough starter, we’ve covered all the essentials. Let’s dive into the art gluten-free sourdough bread recipe, where each slice is as satisfying as the last.
1: Introduction to Gluten-Free Sourdough Bread
Gluten-Free Sourdough Bread: A Delightful Alternative
Who says you have to give up the joy of sourdough if you’re avoiding gluten? Not us! Gluten-free sourdough bread offers the same tangy flavor and chewy texture as its wheat-based counterpart, making it a fantastic option for those with celiac disease or gluten sensitivity. This introduction will ease you into the world of gluten-free baking, showing you it’s not only possible but also quite enjoyable to create delectable sourdough bread without gluten.
Benefits of Making Your Own Gluten-Free Sourdough Bread
Baking your own bread has a charm that goes beyond just the taste. It’s about creating something with your own hands, tailored to your dietary needs. Here’s why you should consider making your own gluten-free sourdough bread:
- Control Over Ingredients: You know exactly what goes into your bread, ensuring that it’s safe and suitable for your dietary restrictions.
- Freshness and Flavor: Homemade bread doesn’t just taste better; it’s free from preservatives and can be enjoyed fresh out of the oven.
- Therapeutic Process: Many find the process of baking bread a therapeutic activity that adds a rewarding element to cooking.
In the next section, we’ll explore the best gluten-free flours for making sourdough bread that not only tastes great but also mirrors the texture of traditional sourdough. Stay tuned as we blend tradition with dietary needs in a delicious way!
2: The Best Flours for Gluten-Free Sourdough Bread
Choosing the Right Gluten-Free Flours
Selecting the perfect blend of gluten-free flours is crucial for achieving the right texture and flavor in your sourdough bread. Unlike traditional wheat flour, gluten-free alternatives can vary widely in their properties and results:
- Rice Flour: A staple in gluten-free baking, rice flour provides a neutral flavor and smooth texture, making it an excellent base for your flour blend.
- Sorghum Flour: Known for its mild, sweet flavor, sorghum flour adds a whole-grain touch without overpowering your bread.
- Teff Flour: Rich in nutrients and with a slightly nutty flavor, teff works well in small quantities to boost the nutritional profile of your bread.
- Psyllium Husk: Although not a flour, psyllium husk is a key ingredient for providing the stretch and structure that gluten typically offers.
Combining these flours can help mimic the characteristics of gluten, ensuring your bread rises beautifully and has a satisfying chew.
How Different Flours Affect Texture and Taste
Understanding how each type of flour impacts your bread’s texture and taste will help you tailor your gluten-free sourdough to your liking:
- Mixing Flours: A blend of flours often yields the best results. For instance, mixing rice flour with teff flour can balance moisture content and add a rich flavor.
- Experimenting with Proportions: Adjusting the proportions of each flour can drastically change the bread’s outcome. Start with tested recipes and tweak them as you gain more confidence.
- Texture and Taste: Each flour not only affects the rise of your bread but also its crust and crumb. For example, almond flour can add a delightful nuttiness but may require adjustments in hydration levels.
In the upcoming section, we’ll dive into creating your very own gluten-free sourdough starter, the heart of any sourdough bread, ensuring it’s robust and ready to leaven your loaves to perfection.
3: How to Create a Gluten-Free Sourdough Starter
Ingredients Needed for the Starter
Creating a gluten-free sourdough starter is similar to making a traditional one, but with a twist on the ingredients. You’ll need:
- Gluten-Free Flour: Choose a flour that ferments well, such as brown rice flour or sorghum flour.
- Water: Use filtered water to avoid any chlorine which can inhibit the growth of your starter.
- A Jar: A clean, clear jar will allow you to watch your starter develop.
The key is to begin with small amounts and feed your starter regularly, allowing the natural yeasts and bacteria to thrive and develop the sour flavors characteristic of sourdough.
Step-by-Step Guide to Making Your Starter
Making your gluten-free sourdough starter involves a simple yet precise process:
- Mixing: Combine equal parts of gluten-free flour and water in your jar. Stir until smooth.
- Covering: Cover the jar loosely with a lid or cloth to allow airflow but keep out contaminants.
- Feeding: Feed your starter daily by discarding half and adding fresh flour and water. Consistency is key to encouraging active fermentation.
- Observing: Look for bubbles and a pleasant, yeasty smell as signs of a healthy starter. This process usually takes about 5 to 7 days.
Once your starter is bubbly and has a tangy aroma, it’s ready to be used in baking your gluten-free sourdough bread. The starter not only leavens the bread but also imparts a depth of flavor that is uniquely sourdough.
In the next part, we’ll guide you through the bread-making process, providing detailed steps to ensure your gluten-free sourdough turns out airy and delightful. Stay tuned for the secrets to mixing, fermenting, shaping, and baking the perfect loaf.
4: Step-by-Step Guide
Mixing and Fermenting the Dough
Once your gluten-free sourdough starter is active, you’re ready to make the dough. Here’s how to get the best results:
- Combine Ingredients: In a large bowl, mix your gluten-free flour blend, water, and a portion of the sourdough starter. Incorporate any additional ingredients like salt or a sweetener to enhance flavor.
- Mix Thoroughly: Ensure that all ingredients are well combined to form a smooth dough. Gluten-free doughs are typically stickier than their gluten counterparts.
- First Fermentation: Allow the dough to rest in a warm place. This stage is crucial as it helps develop the flavors and structure of the bread through fermentation.
Shaping and Baking Your Loaf
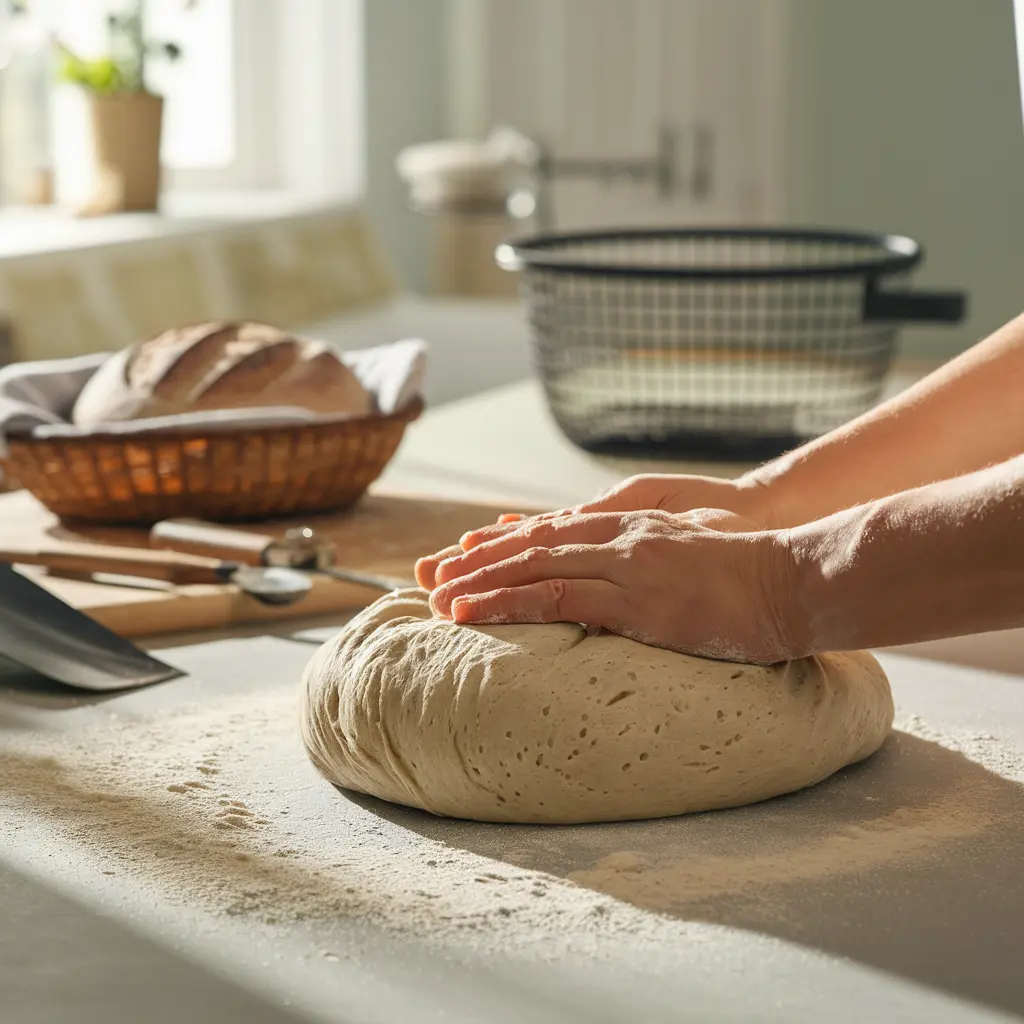
Shaping gluten-free sourdough bread can be tricky due to the lack of gluten, but with the right technique, you can achieve a beautiful loaf:
- Shaping the Dough: Use wet hands to shape the dough into a loaf. Gluten-free dough doesn’t hold its shape as well, so a bread tin can be beneficial.
- Second Fermentation: Allow the shaped dough to undergo a second rise, usually taking less time than the first. Look for slight swelling and a puffy appearance.
- Baking: Preheat your oven to the recommended temperature. Bake your bread until golden and a thermometer inserted into the center reads the correct temperature for done bread.
Once baked, let your bread cool on a rack before slicing to maintain its structure. This step is essential as it completes the cooking process internally.
In the upcoming section, we’ll explore advanced techniques to perfect your gluten-free sourdough—from achieving the best oven spring to maintaining your sourdough starter for continued success. Stay tuned to elevate your gluten-free baking skills further!
5: Advanced Techniques for Perfect Gluten-Free Sourdough
How to Achieve the Best Oven Spring
Getting a good oven spring with gluten-free sourdough bread can be challenging, but it’s not impossible. Here are some tips to help your bread rise beautifully in the oven:
- Preheat Your Oven: Ensure your oven reaches the right temperature before baking. A hot oven is critical for a good spring.
- Use a Dutch Oven: Baking your bread in a Dutch oven can help trap steam around the bread, mimicking a professional baker’s oven. This steam is crucial for achieving a good rise.
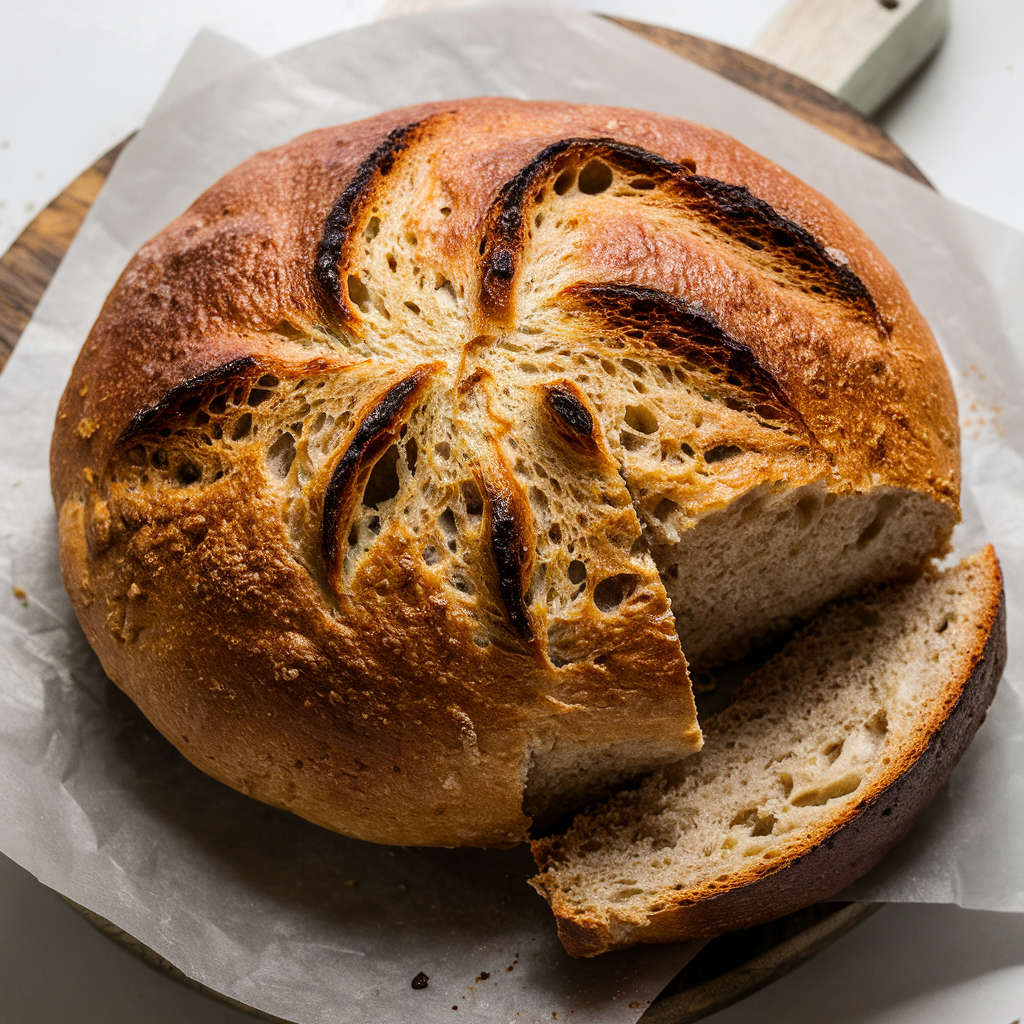
- Score the Bread: Gently scoring the top of your dough can help it expand during baking. Since gluten-free dough is more delicate, a shallow score is enough.
These steps encourage the dough to rise upwards rather than spread outwards, creating a lighter, airier loaf.
Tips for Maintaining Your Sourdough Starter
A healthy starter is the backbone of great gluten-free sourdough bread. Keep your starter vigorous and ready for baking with these tips:
- Regular Feeding: Feed your starter consistently at the same time each day with fresh gluten-free flour and water to maintain its health and activity.
- Keep it Warm: Sourdough starters thrive at warm temperatures. Find a spot in your kitchen that’s consistently warm, but not too hot, to help maintain an active culture.
- Watch for Contamination: Always use clean utensils when handling your starter to prevent unwanted bacteria from influencing its growth.
Maintaining a starter requires attention and adjustment based on how it looks, smells, and behaves. A happy starter will produce better-tasting and better-rising bread.
In our next part, we’ll address common challenges that might arise when making gluten-free sourdough bread. From gummy textures to dense loaves, we’ll provide solutions to ensure your baking success. Stay tuned for practical troubleshooting tips that will save your loaf!
6: Troubleshooting Your recipe
Why Is My Bread Gummy?
Encountering a gummy texture in your gluten-free sourdough bread can be disheartening, but it’s a common issue with a few possible solutions:
- Undercooked Bread: Ensure your bread has baked thoroughly. Gluten-free bread often requires a longer baking time than traditional wheat bread. Use a digital thermometer to check that the internal temperature reaches at least 210°F (99°C).
- Excess Moisture: Gluten-free flours can absorb and retain more water. Adjust the hydration levels in your recipe if your bread consistently turns out gummy.
- Insufficient Fermentation: Allow more time for fermentation, especially during the first rise, to help the yeast fully activate and work through the dough.
Adjusting these factors can significantly improve the texture of your bread, making it lighter and more enjoyable.
How to Prevent a Dense Loaf
A dense loaf of bread is often the result of several manageable factors in gluten-free baking:
- Increase Leavening Agent: Sometimes, increasing the amount of starter used can introduce more air and lift into your dough.
- Improve Flour Blend: Incorporating lighter flours like tapioca or potato starch can help lighten the bread’s texture.
- Proper Mixing: Ensure that your dough is thoroughly mixed to evenly distribute the yeast and air pockets. However, avoid overmixing, which can deflate some of the air built up during fermentation.
By addressing these points, you can enhance the overall texture and rise of your gluten-free sourdough, resulting in a more appealing loaf.
7: Perfecting Your Gluten-Free Sourdough Techniques
In this concluding part, we explore how to refine your gluten-free sourdough bread techniques, elevating your baking to the next level and ensuring consistent, delicious results every time.
Mastering Hydration Ratios
Hydration plays a pivotal role in the texture and handling of gluten-free sourdough bread. Here’s how to master it:
- Adjust Hydration Based on Flour: Different gluten-free flours absorb water at varying rates. Start with the manufacturer’s recommendation and adjust based on the dough’s consistency and your climate.
- Slowly Incorporate Water: Add water gradually to your mix, allowing the flour to fully absorb it before adding more. This method helps prevent a batter that is too wet or dry.
Enhancing Crust and Crumb
Achieving a desirable crust and soft crumb in gluten-free bread can be challenging but not impossible:
- Steam in the Oven: Introduce steam during the first few minutes of baking by placing a pan of hot water at the bottom of the oven. Steam helps the crust develop better and prevents it from hardening too quickly.
- Use a Bread Cloche: A bread cloche can mimic a professional baking environment by trapping moisture naturally released during baking, which enhances both crust and crumb.
Consistent Baking Results
Reproducing the same quality with each batch requires consistency and attention to detail:
- Oven Calibration: Ensure your oven is accurately calibrated. An oven thermometer can help verify that your oven’s internal temperature matches the setting.
- Repetition and Notes: Keep a baking diary to note variations in flour types, hydration, fermenting times, and baking durations. Over time, this record will guide your adjustments for consistently perfect results.
By focusing on these advanced techniques, you’ll be able to consistently produce gluten-free sourdough bread that not only tastes great but also brings satisfaction and joy to your baking. Whether you’re a novice or an experienced baker, these tips will help ensure that each loaf is as good as, if not better than, the last.
For those interested in exploring other gluten-free recipes, such as delicious cheesecakes, check out these creative options to broaden your gluten-free culinary horizons
Next, we’ll move on to our final part, where we answer some of the most commonly asked questions about making gluten-free sourdough bread. This section aims to clear up any remaining uncertainties and provide you with the confidence to bake perfect gluten-free loaves every time.
8: Frequently Asked Questions About Gluten-Free Sourdough Bread
In this section, we’ll address some of the most common inquiries and concerns bakers have when tackling gluten-free sourdough bread. This FAQ will serve as a quick reference to help troubleshoot common problems, understand better practices, and demystify the process of making delicious sourdough without gluten.
What’s the Best Way to Store Gluten-Free Sourdough Bread?
Storing gluten-free sourdough bread properly is essential to maintaining its freshness and texture. Here’s how to keep your bread at its best:
- Room Temperature: Store your bread in a cool, dry place in a bread box or a paper bag for 2-3 days.
- Refrigeration: Although refrigeration can dry out the bread, it may be necessary for longer storage. Wrap it tightly to prevent moisture loss.
- Freezing: For long-term storage, slice your bread and freeze it in an airtight bag. Thaw slices as needed directly in the toaster or oven for best texture.
Can I Use Commercial Yeast in My Gluten-Free Sourdough?
Yes, you can use commercial yeast to help ensure the rise of your gluten-free sourdough bread, especially when you’re just starting out:
- Hybrid Approach: Adding a small amount of commercial yeast to your sourdough recipe can help guarantee a good rise and is particularly useful while you’re still cultivating a strong gluten-free sourdough starter.
- Yeast Selection: Opt for instant yeast for its ease of use and reliability in gluten-free baking.
How Can I Make My Gluten-Free Sourdough More Flavorful?
Enhancing the flavor of your gluten-free sourdough bread involves a few tweaks and additions:
- Longer Fermentation: Allowing your dough to ferment longer can develop deeper flavors, similar to traditional sourdough.
- Inclusions: Add ingredients like olives, nuts, seeds, or dried fruits to introduce new flavors and textures.
- Herbs and Spices: Incorporate herbs like rosemary or spices such as cinnamon to give your bread a unique twist.
This FAQ section aims to arm you with the knowledge and confidence to tackle any aspect of gluten-free sourdough bread making, ensuring every loaf you bake is as rewarding as it is delicious.